Yikes. It’s May already and even though I’m way behind on sharing progress here on the blog I’m still miraculously on track to knocking out my Budget Room Refresh SMART goals for 2020. Let me catch you up.
Boys’ Room
In February I set out to turn the boys’ drab diggs into an exciting nautical dream room. This room was previously an office, a guest room and went through many different configurations as a toddler bedroom for our eldest son. But now it was time for the younger brother to move in since he was being evicted from the nursery.
With a budget of only $500 and a wishlist as far as my mind’s eye could see, I knew I would have to get creative with my materials.
Decluttering
First things first, I always start by getting rid of as much clutter as possible. This included an intensive exercise of going through every item of clothing I had for each of the boys. You can check out my tips for decisively decluttering kids stuff if you want to know more about my process.
Editing
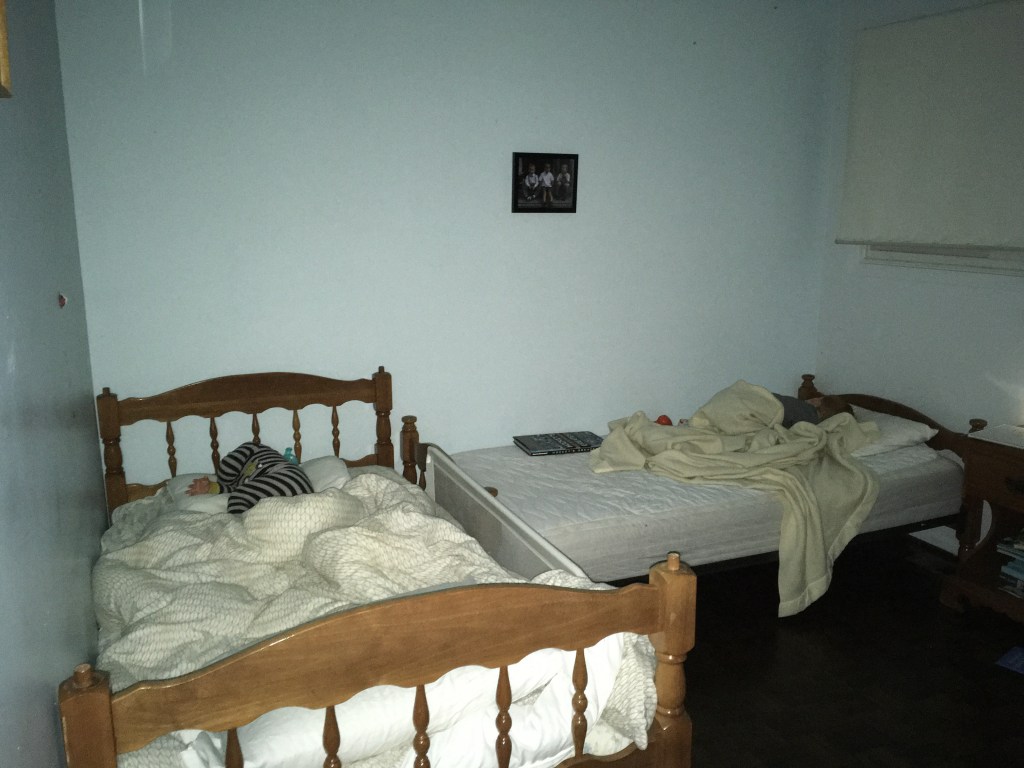
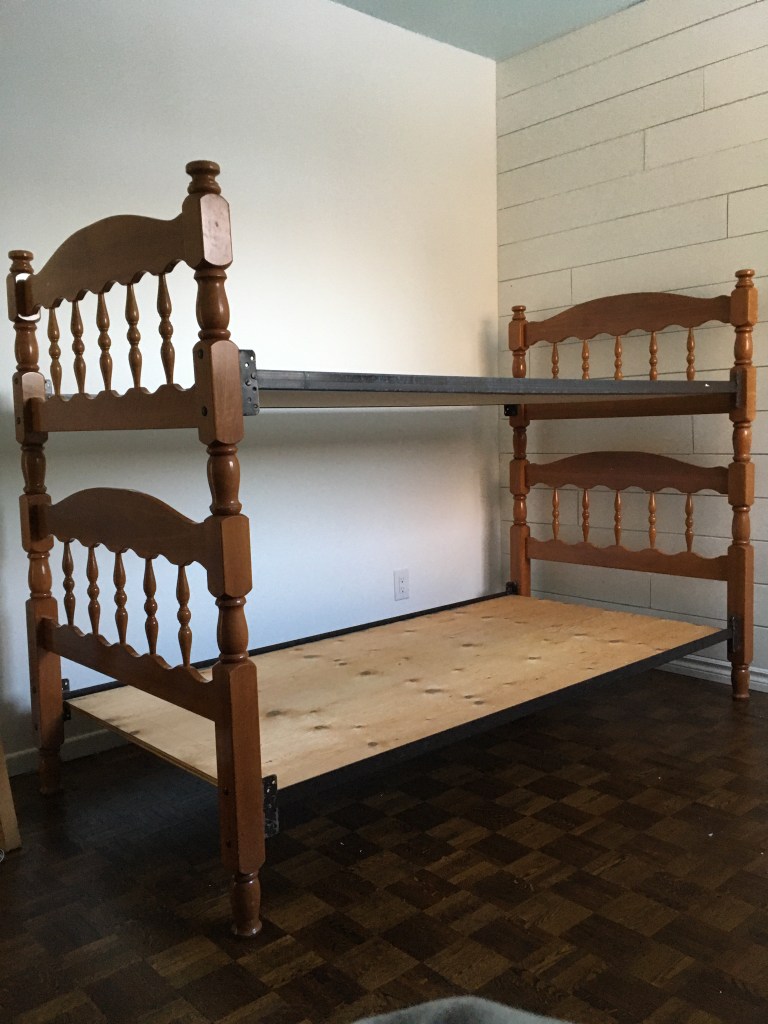
There wasn’t much furniture in the bedroom to begin with. I knew the layout I wanted and that the bunk bed wasn’t going to work for what I had in mind even when the beds weren’t stacked so it had to go. I posted it on Facebook Marketplace and it was gone the same day!
There was also a light fixture we had still in its original packaging that was purchased to replace the compass one that was already in the room.
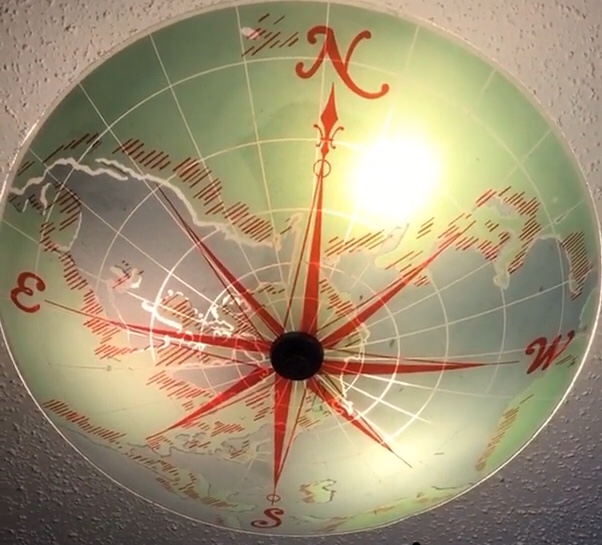
Since I decided to keep the compass one and we didn’t have anywhere else we would install the light I sold that too on Marketplace. Woohoo! Otherwise, there wasn’t much to edit out of the room, I just had to think strategically about what I would bring in to maximize the space.
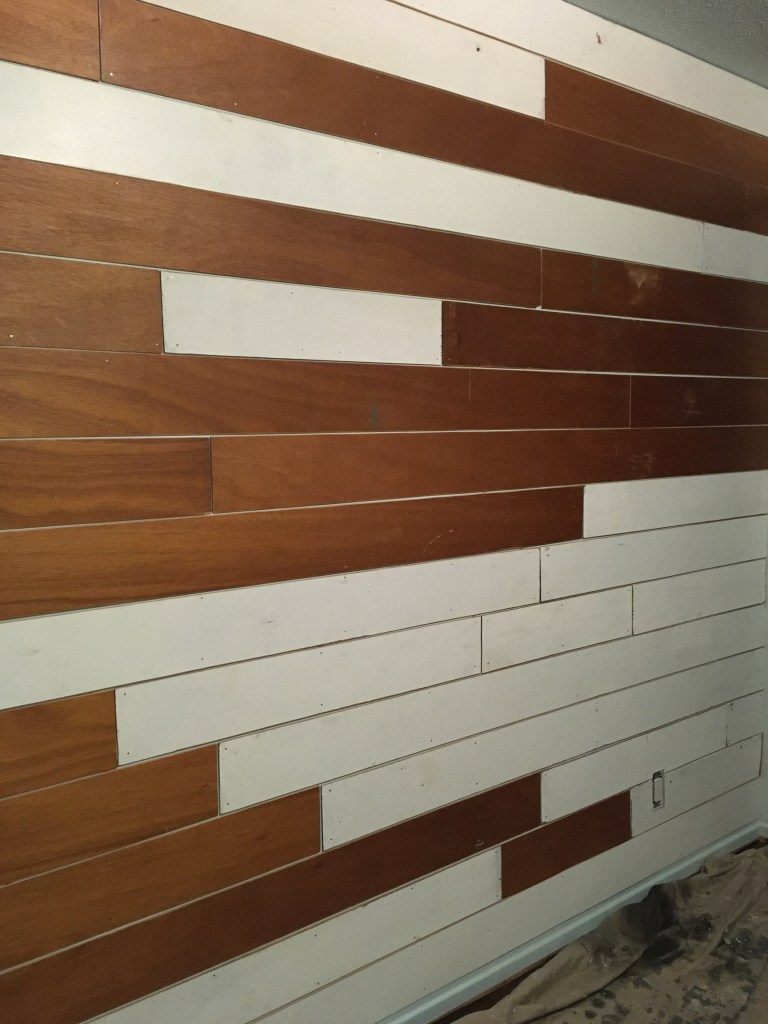
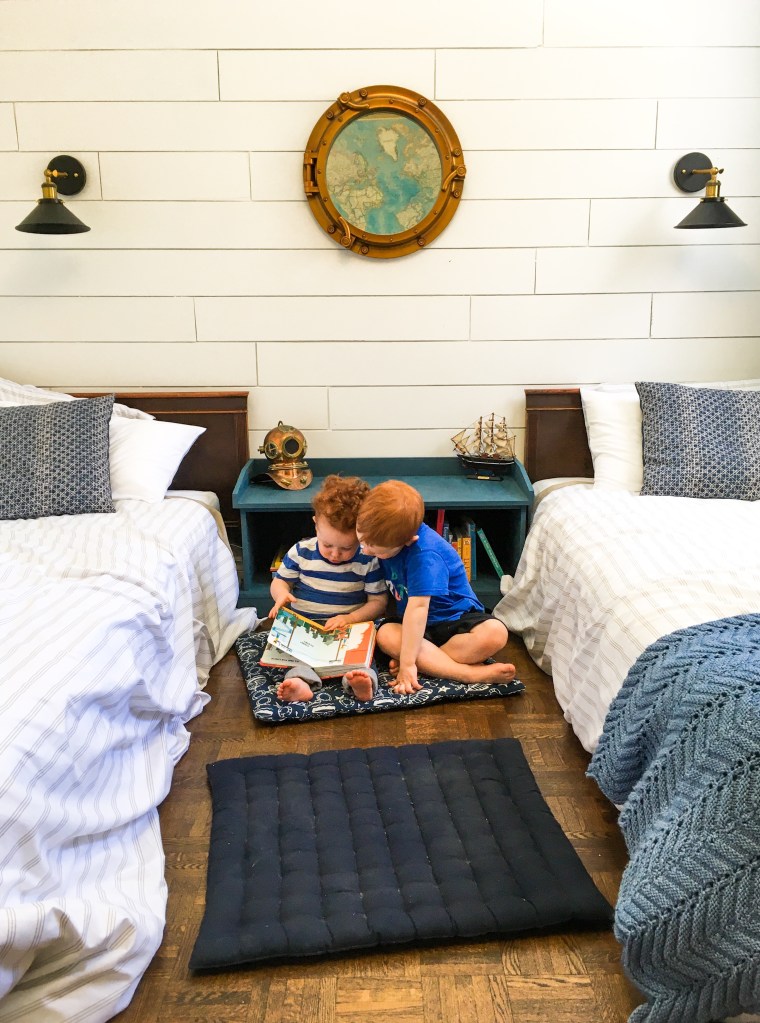
Faux Shiplap Wall
In the Master Bedroom we did a board and batten grid feature wall. This time I wanted to try something else and since the theme of the room is nautical I was eager to try doing shiplap! You can buy tongue and groove shiplap boards at most home improvement stores but it’ll cost you an arm and a leg. I knew I wanted the look without the price tag so I thought outside the box.
We had some of the old builder grade doors that came with the house in the basement and I thought to myself, “That’s perfectly good plywood! Why buy plywood sheets at the store when I have these right here?!”
Since the doors had plywood on both sides we figured we had plenty to cover the wall with 3 full sized doors. Dan ripped them on the table saw for me and we discovered that they’re not completely hollow like we assumed; there was a cardboard honeycomb support glued inside. Not a problem though as they came apart easily and we could just put the side with the glue residue against the wall when installing them.
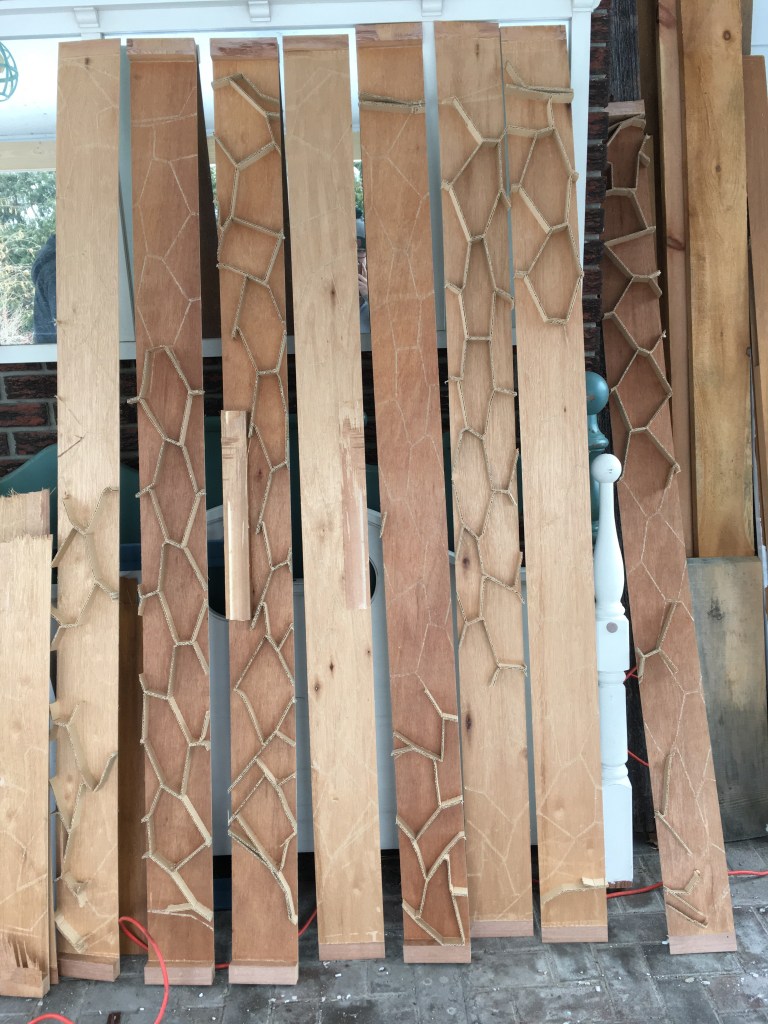
I sanded the edges to make sure there were no potential splinters lurking and we nailed them up by hand onto the wall with a bit of construction adhesive for good measure. We purposefully left a small space between all of the boards so that the shiplap effect would be apparent. Et voila! A faux shiplap wall that cost us nothing but our time and materials we already had on hand. This room was off to a great start!
Painting
We bought our paint during a promotion at our Home Depot (we did get our mail in rebate on the paint products we purchased). We decided to go with Whisper White by Behr and I’m very happy with it! We did use a primer we had on hand on the shiplap wall before painting our final wall colour.
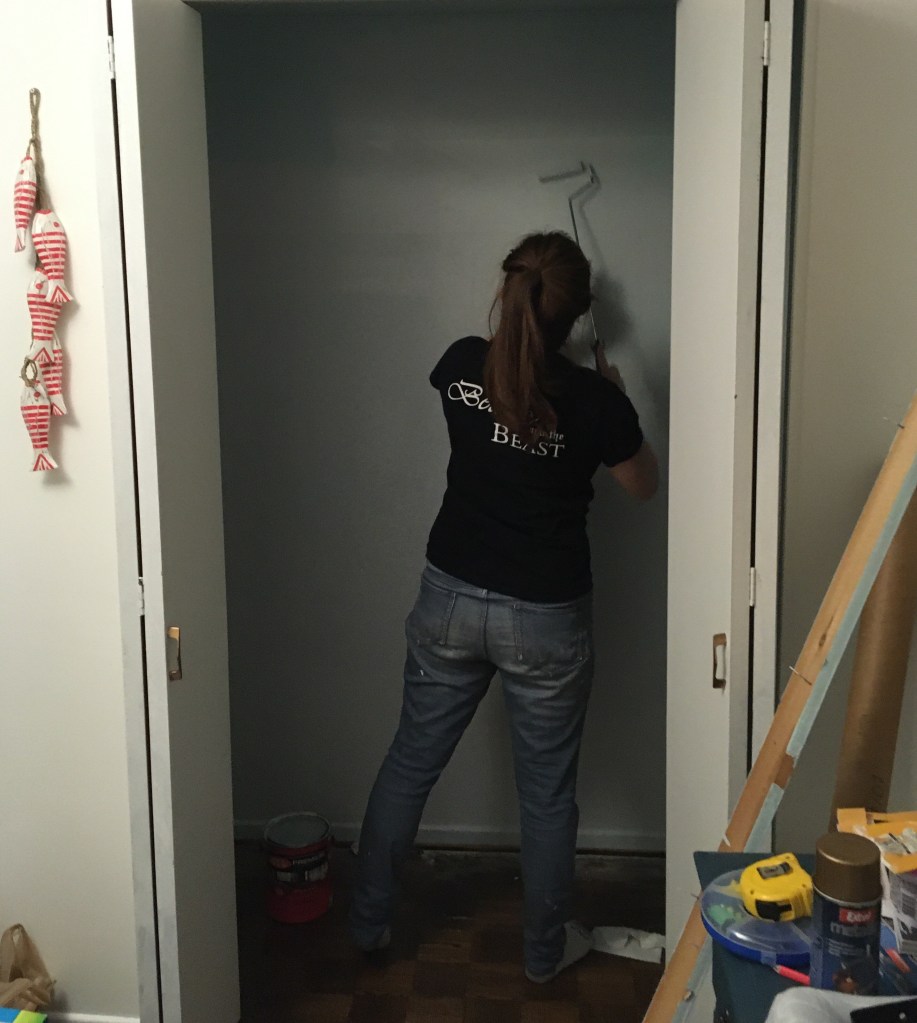
I painted the inside of the closet with a blue colour we had leftover from our bathroom 5.5years ago. It did the trick!
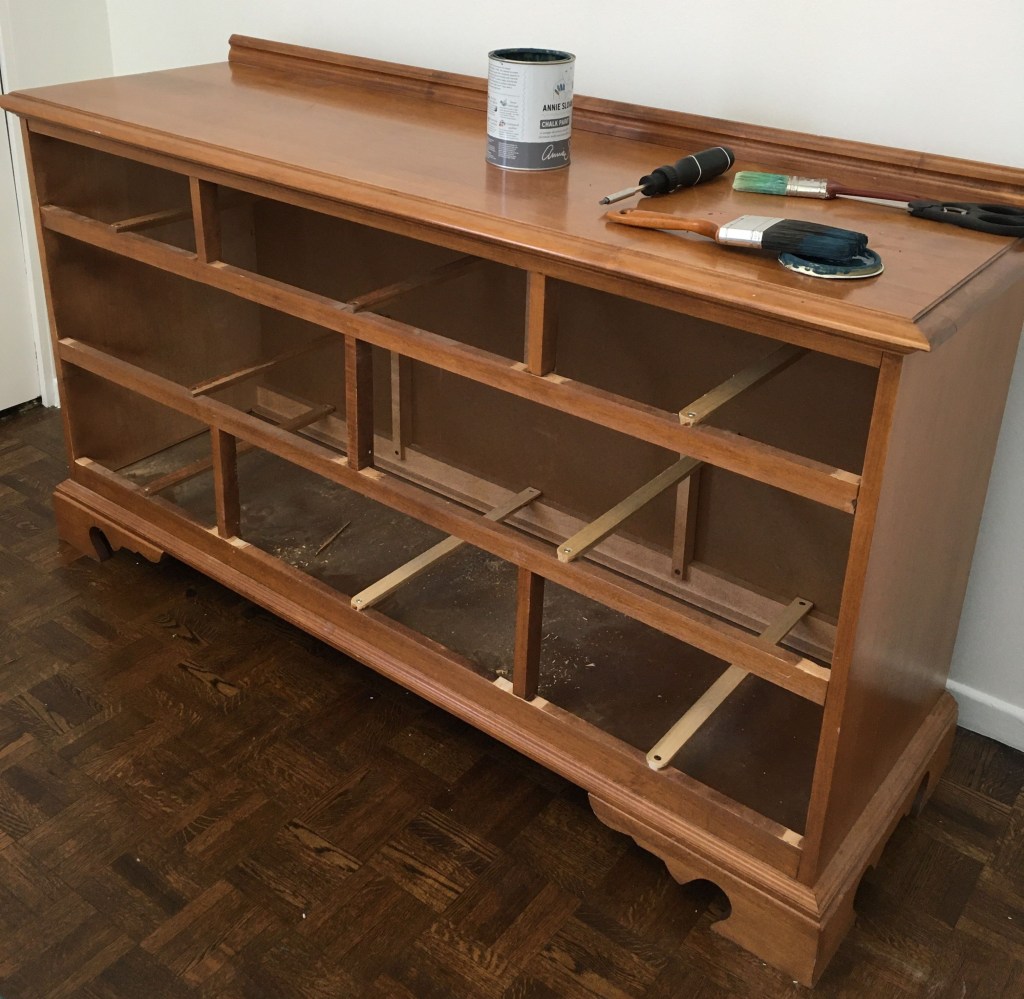
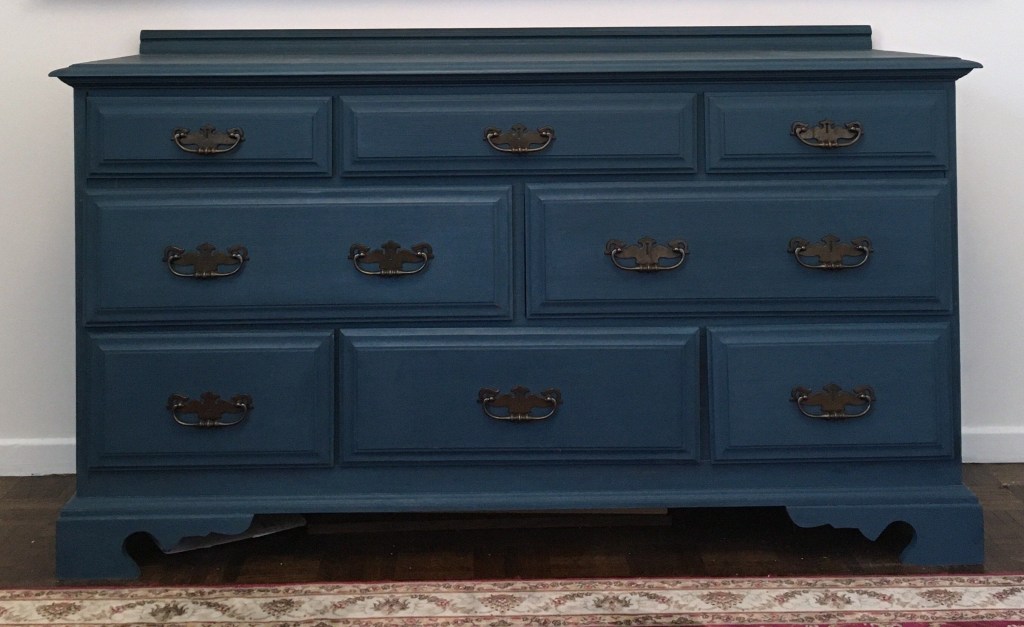
I also used Annie Sloan Chalk Paint to transform the furniture pieces in the room. The dresser, book bench turned bedside table and bedside table turned desk all got two coats of Annie Sloan Chalk Paint in Aubusson Blue. I sealed them all with Annie Sloan Soft Wax in Clear and I love how they turned out!
Closet
Since there isn’t any room for a desk in this room I decided to build one into the closet. I painted a piece of plywood leftover from our old master bedroom closet the same colour as the bedside table and mounted it with some basic shelf supports and anchors on both sides of the closet. The table with the drawer isn’t fixed and can be moved from side to side to allow easy access to the floor space for storage or to allow both boys to sit at the desk at the same time.
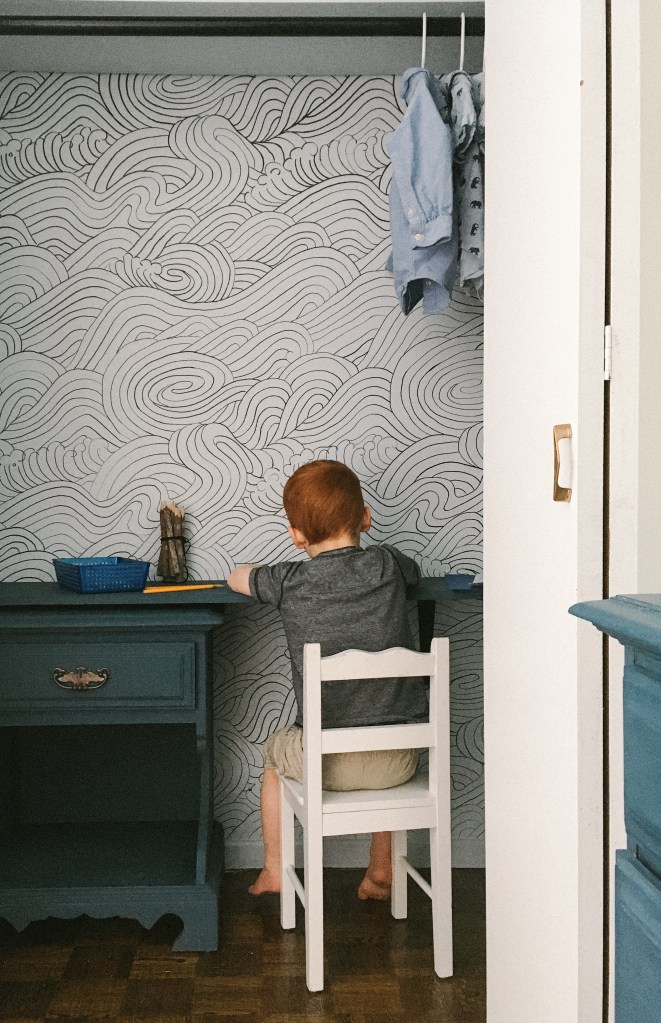
I wanted to have a cool nautical visual element inside the closet too. I had seen a wonderful wave patterned wallpaper but again, it was expensive and since I didn’t want to eat into my budget or attempt wallpapering again, I decided to try recreating the pattern using Sharpie permanent markers. I had seen people do Sharpie Walls on Instagram before but never this kind of pattern. I borrowed a projector from a friend of mine and got to tracing. It took one whole evening, a sore arm and about 10 markers but it was so worth it.
We raised the upper shelf and clothing rod in the closet to maximize the amount of the pattern you see when the doors are open. It’s such a fun surprise every time I open the doors. It’s one of my favourite elements of the room.
Sconces
I found these sconces on Amazon and was able to score them at a discounted price because they were marked “Used/As Is.” It’s always a bit of a gamble buying used items from Amazon but there wasn’t a thing wrong with these beauties they arrived in the original packaging!
I assume someone returned them? I can’t tell you if the wiring is alright; could be faulty as far as I know because they’re not hardwired at all. These are installed above the beds for the aesthetic! They do have battery operated puck lights in them though. This is known as the Magic Light Trick made popular by Brooke from Nesting with Grace. The lights can be clicked on and off manually or with a remote control.
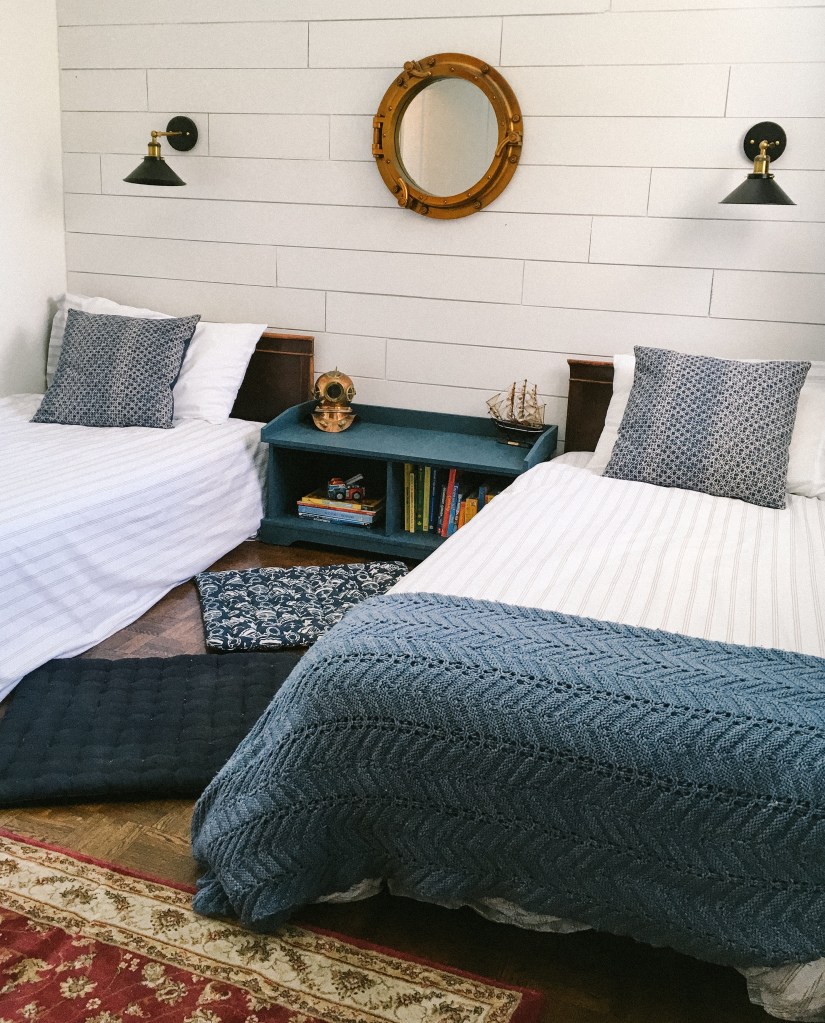
I put my own spin on it by securing the puck lights in place with super glued magnets. Since my kiddos are pretty young I wanted the option to easily remove the light if they were abusing it at bedtime. The magnets make it easy to pop them back in whenever. It will also make battery changing easier; thankfully we haven’t had to change the batteries yet though. These puck lights were the best ones I could find at a decent price and came in a pack of 6 so I have more if I want to use the Magic Light Trick anywhere else in my house.
Map
One of the bedroom walls is completely dominated by a large map of the world! I knew I wanted to include a map of the world somewhere in the room and had been searching online for one. I told my mother-in-law what I had planned for the wall above the dresser and she told me to look no further. She gifted us this world map from 1980 that had unfortunately been rolled up in a corner of her basement for the last number of years. It was given to her by my father-in-law as an engagement present. I keep picturing him saying, “I’ll give you the world Mary-Beth!” à la Jimmy Stewart in It’s a Wonderful Life.
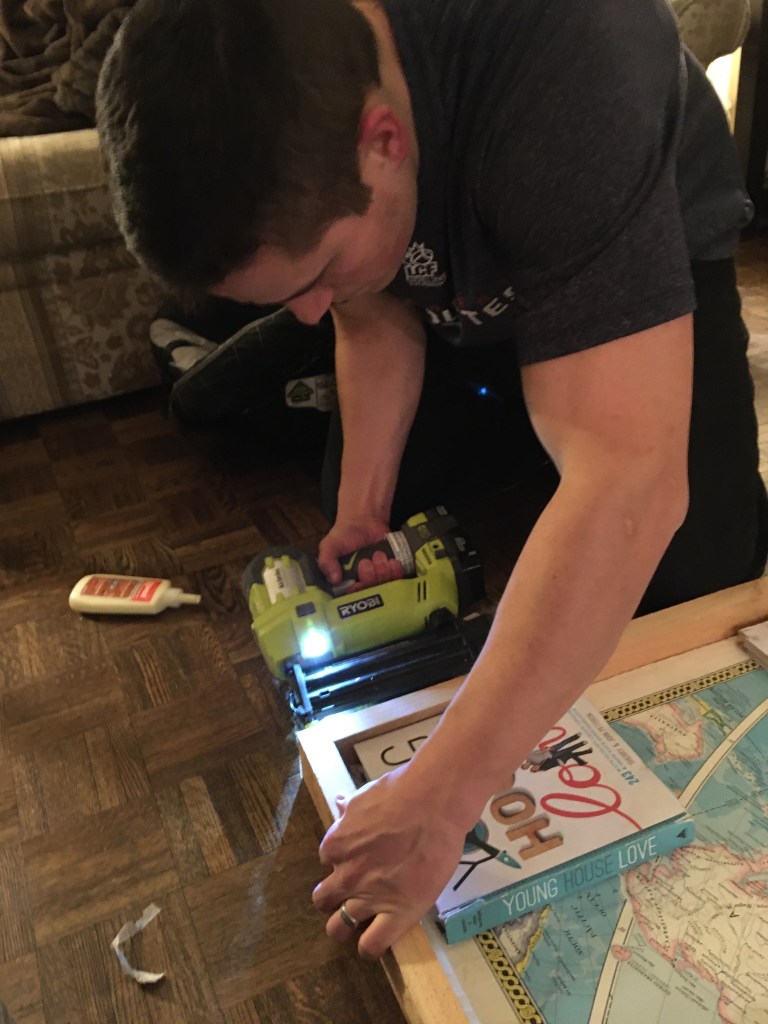
I hope to share a more in depth tutorial about how we turned the paper map into a framed pushpin travel display. The gist is that I used wallpaper adhesive to stick it to a piece of foam insulation and built this custom frame with some barn boards I had in storage.
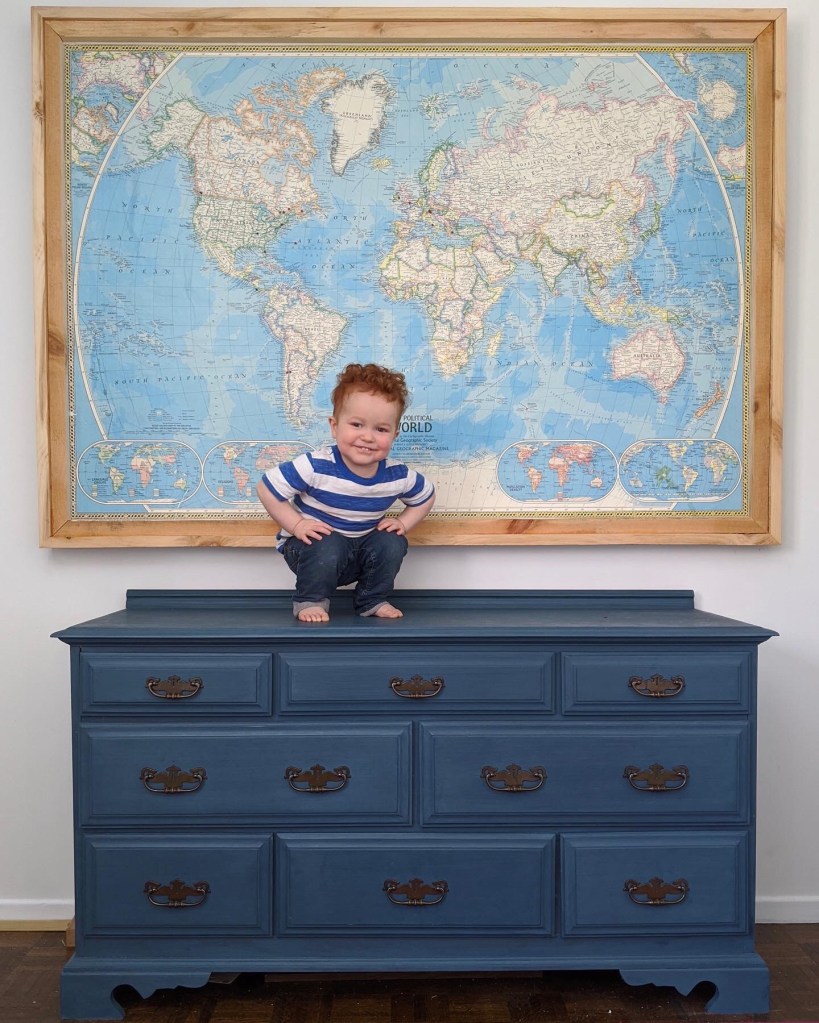
It nearly takes up the entire wall! We’ve enjoyed putting pushpins in it to mark the places we’ve been and telling the boys about our travels.
Secondhand Items
Nearly everything in this room is secondhand or made of repurposed materials. The bedding and the sconces are the only things I had to buy.
I‘ve already explained how the faux shiplap wall is made of plywood taken from old builder grade doors and the large map of the world was given to us by my mother-in-law. The bookshelf nightstand is my sister’s old entryway bench just with a fresh coat of chalk paint. The headboards were given to me by a neighbour years ago and I finally pulled them out of my basement storage. The rug was freecycled. The bed risers are made of old wooden palettes.
Most significantly, much of the nautical decor was inherited from a friend of my husband who passed away. He served in the Royal Canadian Navy and loved the nautical decorative items he collected over the years. He is dearly missed and I’m so glad we can honour his memory by including some of his pieces in this room.

I’m proud of how resourceful I was when piecing this room together but it would not have turned out this way if it weren’t for the secondhand items I was lucky to get.
The paint, bedding, sconces and puck lights, and soft close ball bearing drawer slides for the dresser are the only things I purchased for this room. It could also be argued that the sconces were technically secondhand since they were “Used” according to Amazon.
The Wish List
All of the above were things on my wish list for the room and I’m proud of how much I accomplished. I’d like to give a special mention to this Nautical Alphabet Signal Flags free printable from I Should Be Mopping the Floor that I did with my son as a quarantine craft. He and I both loved it so much and it goes so well in the room it is now a permanent fixture in the room.

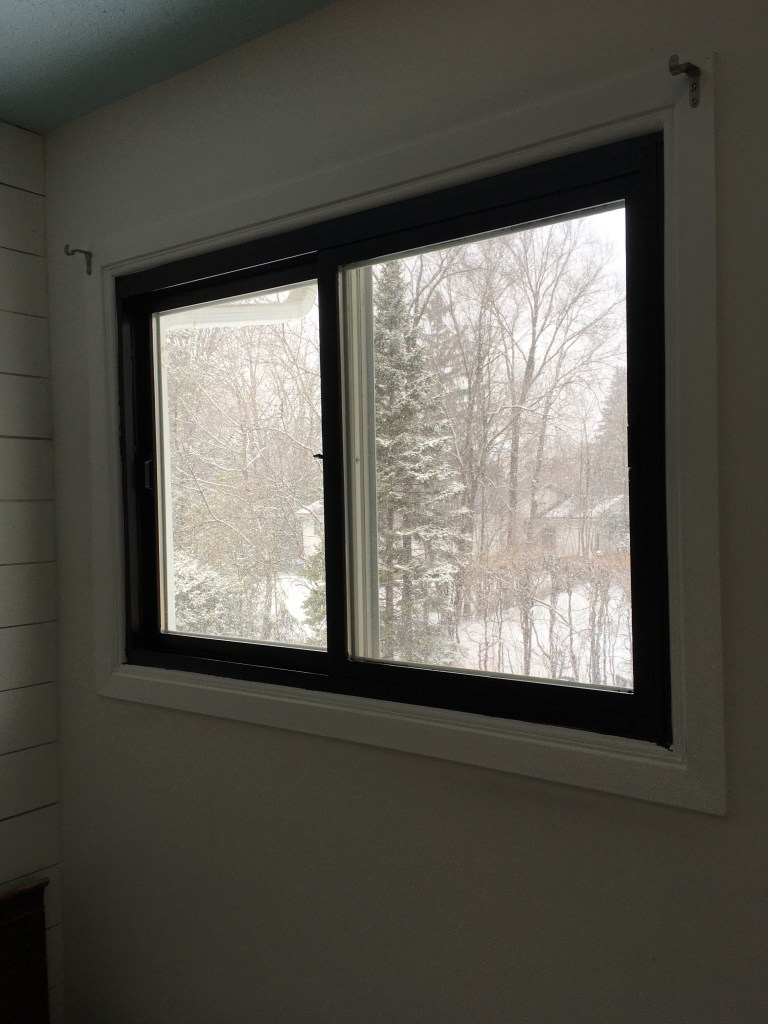
Another thing I did that I’m not totally convinced I like is spray painting the frame of the window black. It’s quite bold and I’m not sure it really goes with the room even though there’s the black sharpie wall and black sconces in there too. Thankfully it hides behind the curtain for the most part.
I also had Dan add some under-mounted drawer slides to the dresser drawers to make them as smooth as possible.
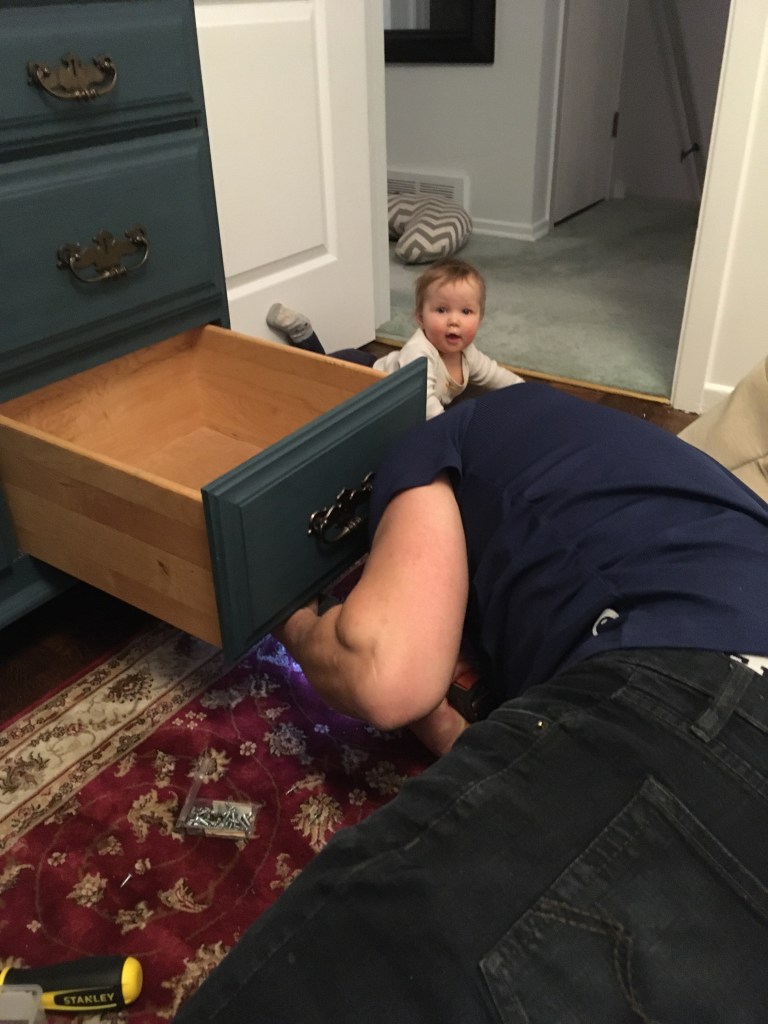
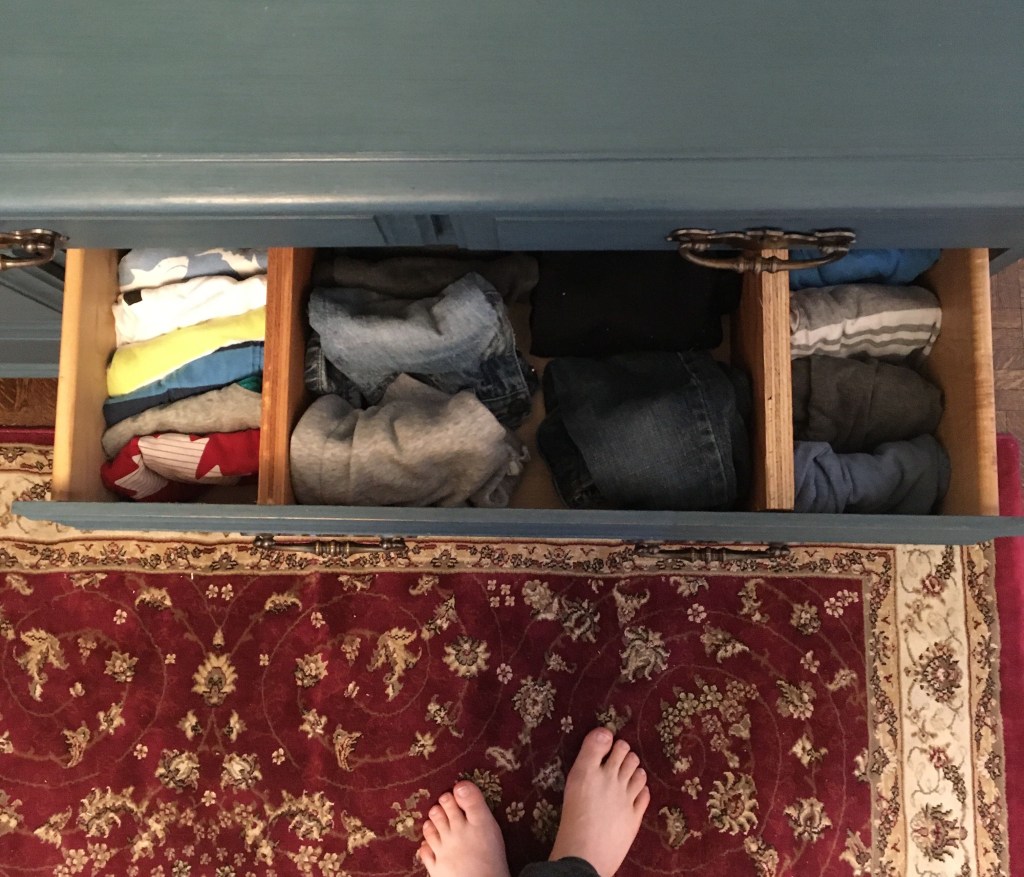
He also added built in divider inside the drawers. The dividers were a creative way to cover the screws coming through the bottom of the drawers from the slides. Now I’m so glad we have them and I don’t want to live without built-in dividers for kids dressers ever again!
There are only two things that remain unfinished in the boys’ nautical room. I want to revisit the gallery wall as I’d like to add a few more elements and switch up the art. I’m also waiting on the arrival of a specialty glow in the dark paint to add some stars to their ceiling. Other than that I’m very happy with how this room turned out!
Budget breakdown
*All dollar amounts reflect Canadian prices
- Paint: $30
- Bedding: $63
- Sconces: $38
- Puck Lights: $29
- Chalk Paint: $40
- Black Spray Paint: $4
- Dresser drawer slides: $60
Total: $264
Budget Notes
- I didn’t include the price of supplies that we already had like nails, screws, spackle, and tools. We also borrowed painting supplies from my good friend (thanks again Shena!) to avoid having to buy everything ourselves.
- The price listed for the bedding includes the duvet cover sets and the sheet sets.
- The price I put down for the sconces is lower than the listed price on Amazon because we bought a pair “Used/As Is” from the warehouse.
- We stayed way under budget because I shopped smart, used what I had and totally lucked out on the secondhand finds. Plus if you consider that I sold our bunk bed for $60 and packaged light fixture for $20, then this room refresh basically cost under $200!
Final Verdict
All in all I’d say this was a successful room refresh. I was able to tackle my entire wishlist and then some and stay way under the budget by using what I had on hand, upcycling, thrifting and shopping the sales.
On to the next room! Cheers!

I love it! So cute.
LikeLike
Thanks so much Johanna! 😊
LikeLiked by 1 person
Said it before… saying it again…
The room turned out fantastic! (You’ve always been so creative!) And you’re welcome for the painting supplies. 🙂
LikeLiked by 1 person
I learned so much from you. Thanks for your example and encouragement!
LikeLike
I love this room so much! I saw it in person partway through (and it looked AMAZING) so it was so much fun to see all the surprises – especially that SHARPIE MURAL. Incredible!
LikeLiked by 1 person
Thanks so much Veronica! It means a lot to have your approval. ❤️
LikeLike